公众号登录流程
前置准备
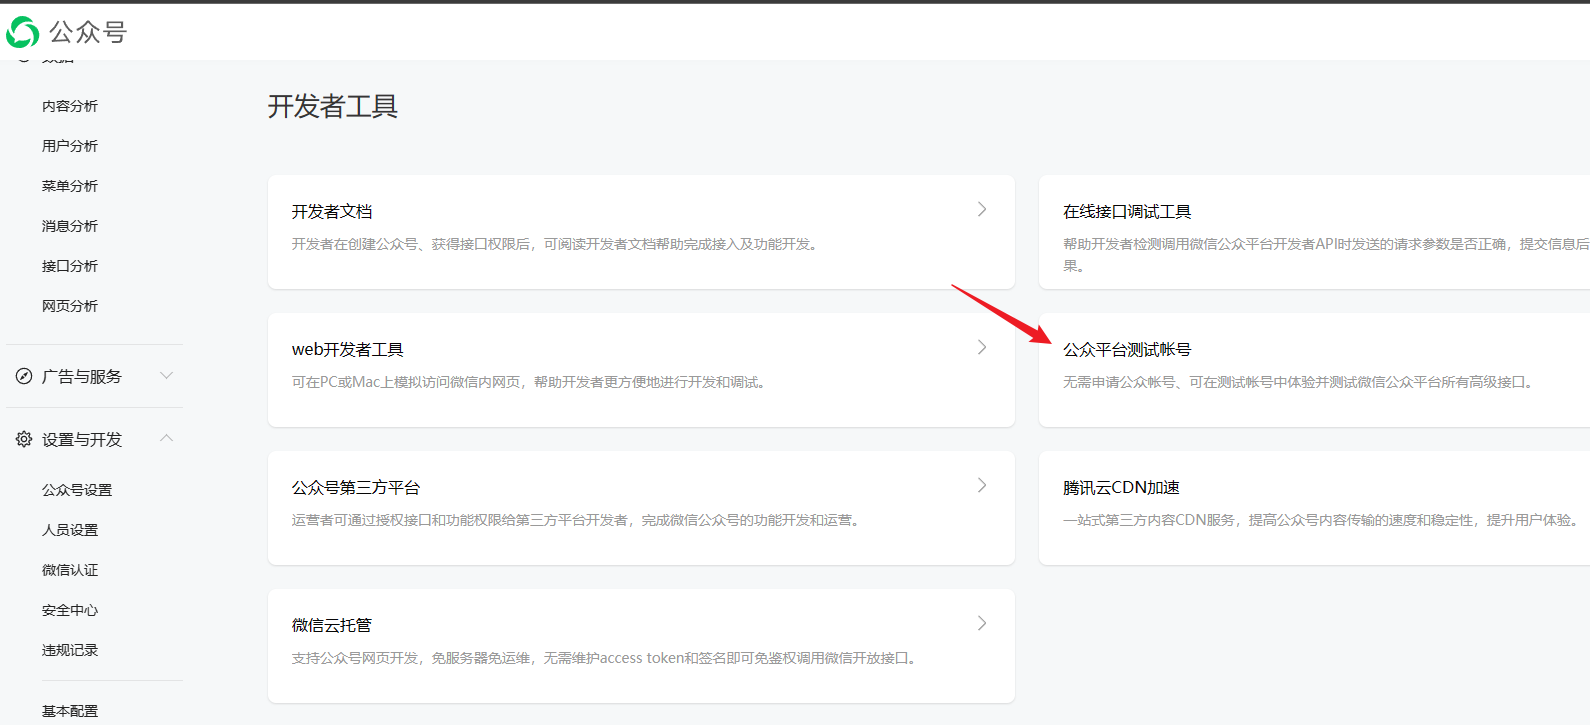
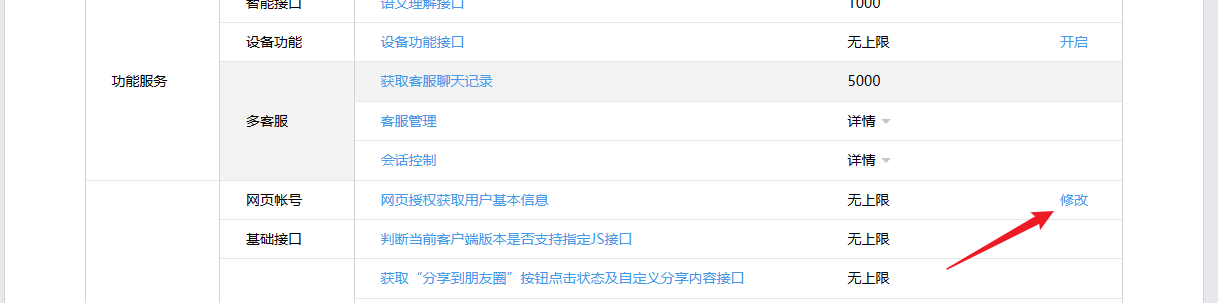
先到 微信公众平台 的开发者中心,开启网页授权功能

对应的文件 Nginx 配置如下
location /OiHVjAiPc2.txt { alias /home/wwwroot/xxx/OiH123iPc2.txt; }
网页授权的两种 scope 的区别说明
scope = snsapi_base发起的网页授权,是用来获取进行页面的用户的 openid 的,并且是静默授权并自动跳转到回调页。用户感知的就是直接进入了回调页(往往是业务页面)。scope = snsapi_userinfo发起的网页授权,是用来获取用户的基本信息,但这种授权需要用户手动同意,并且由于用户同意过,所以无需关注,就可在授权后获取该用户的基本信息。
注意: 用户管理类接口中的"获取用户基本信息接口",是在用户和公众号产生消息交互或关注后推送后,才能根据用户 OpenId 来获取用户基本信息。这个接口,包括其他微信接口,都是需要该用户 (即 openid) 关注了公众号后,才能调用成功的。
网页授权 access_token 和普通 access_token 的区别
- 微信网页授权是通过 OAuth2.0 机制实现的,在用户授权给公众号,公众号可以获取到一个网页特有的接口调用凭证(网页授权 access_token),通过网页授权 access_token 可以进行授权后接口调用,如获取用户基本信息;
如果需要本地测试可以使用微信公众号的测试账号
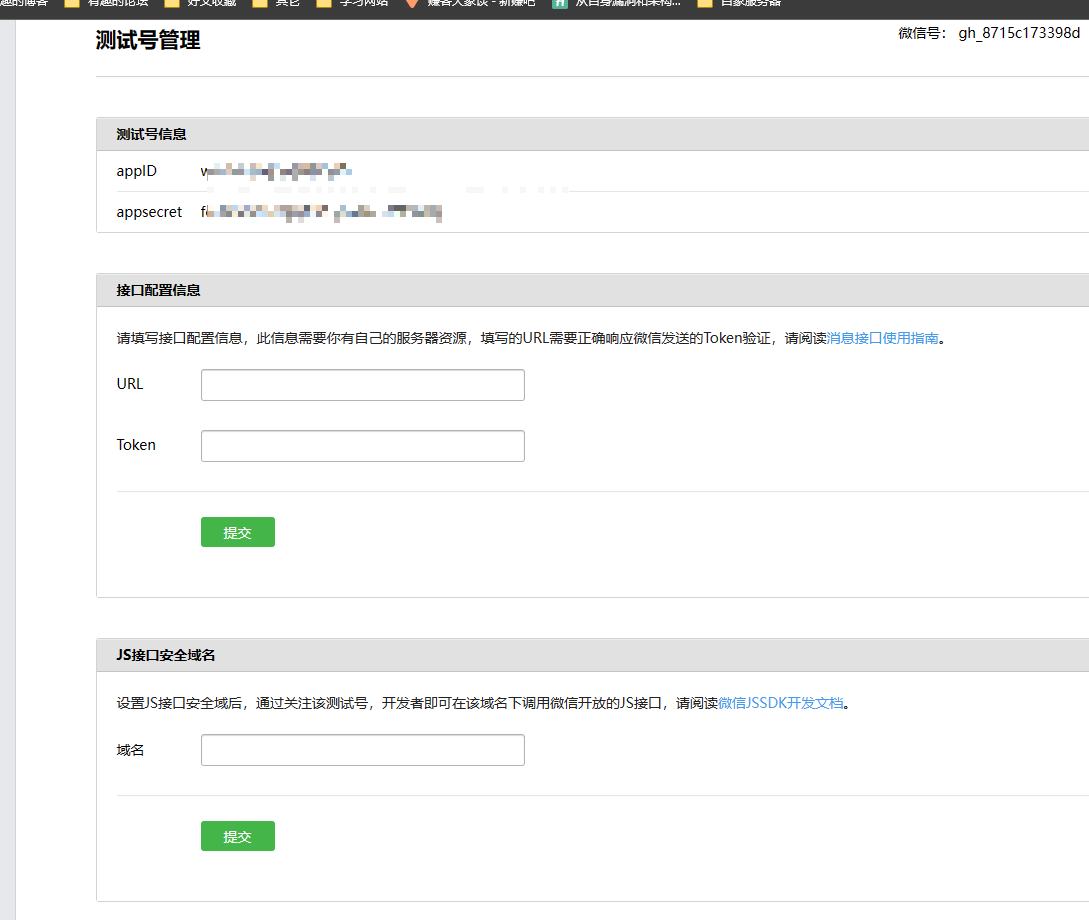
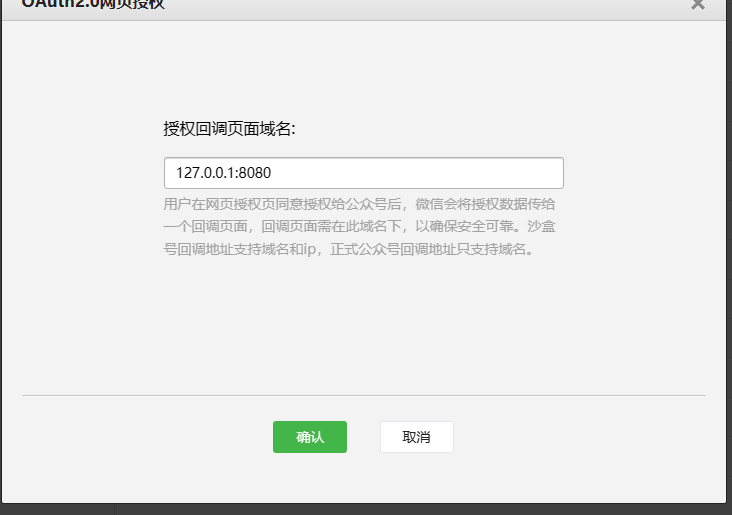
这里只需要填写 ip 和 端口即可
公众号H5的授权流程
具体参考文档 https://developers.weixin.qq.com/doc/offiaccount/OA_Web_Apps/Wechat_webpage_authorization.html#0
第一步:用户同意授权,获取 code
在确保微信公众账号拥有授权作用域(scope参数)的权限的前提下(已认证服务号,默认拥有 scope 参数中的 snsapi_base 和 snsapi_userinfo 权限)
打开链接
https://open.weixin.qq.com/connect/oauth2/authorize?
appid=${公众号appid}&
redirect_uri=${回调域名}&response_type=code&
scope=snsapi_userinfo&state=STATE#wechat_redirect
用户同意授权后
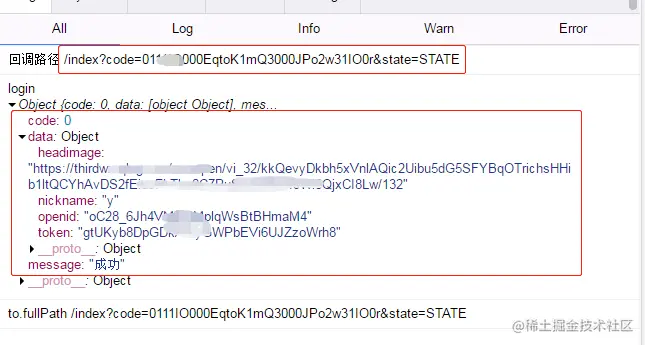
如果用户同意授权,页面将跳转至 redirect_uri/?code=CODE&state=STATE
code 说明: code 作为换取 access_token 的票据,每次用户授权带上的 code 将不一样,code 只能使用一次,5 分钟未被使用自动过期。
<template>
  <div>
    <button @click="wechatLogin">微信登录</button>
  </div>
</template>

<script>
import axios from 'axios';
import qs from 'qs';

export default {
  methods: {
    wechatLogin() {
      // 构造授权URL
      const redirectUri = 'http://your-domain.com/callback'; // 替换为实际的回调URL
      const appId = 'your-app-id'; // 替换为实际的App ID
      const scope = 'snsapi_userinfo'; // 授权作用域
      const state = 'your-state'; // 可选的状态参数,用于回调时校验
      const authUrl = `https://open.weixin.qq.com/connect/oauth2/authorize?appid=${appId}&redirect_uri=${encodeURIComponent(redirectUri)}&response_type=code&scope=${scope}&state=${state}#wechat_redirect`;

      // 重定向到授权URL
      window.location.href = authUrl;
    }
  }
}
</script>
注意,这里发起了一个 GET 请求,这个请求会被微信重定向到你的回调地址(这个回调地址也是前端页面),从微信授权页面获取用户的授权之后,微信服务器重定向到我们的中转页面,此时的 URL 链接中将带有 code 参数,我们则要获取 code 之后,去访问我们的后端系统。如果授权成功,后端将生成 token 返回,代表登录成功,前端获取到 token,保存好 token 设置登录状态。
function getUrlParams() {
  const urlParams = new URLSearchParams(window.location.search);
  const params = {};

  for (const [key, value] of urlParams) {
    params[key] = value;
  }

  return params;
}

// 使用示例
const params = getUrlParams();
console.log(params);

// 获取 code 参数
const code = params.code;
// 获取 state 参数
const state = params.state;

console.log('code:', code);
console.log('state:', state);
第二步:通过 code 换取网页授权 access_token
使用 https://powerwechat.artisan-cloud.com/zh/official-account/oauth.html
func (uu *UserUsecase) WxAuthLogin(ctx context.Context, req *pb.WxAuthLoginRequest) (*pb.LoginResponse, error) {
    tokenResponse, err := uu.oa.OAuth.TokenFromCode(req.Code)
    if err != nil {
        return nil, err
    }

    for k, v := range *tokenResponse {
        uu.log.WithContext(ctx).Infof("WxAuthLogin Key: %v, Value: %v", k, v)
    }

    // accessToken := (*tokenResponse)["access_token"].(string)
    // openID := (*tokenResponse)["openid"].(string)

    return &pb.LoginResponse{
        Token: "xxxxxxxxxxxxxxxxxx",
    }, nil
}
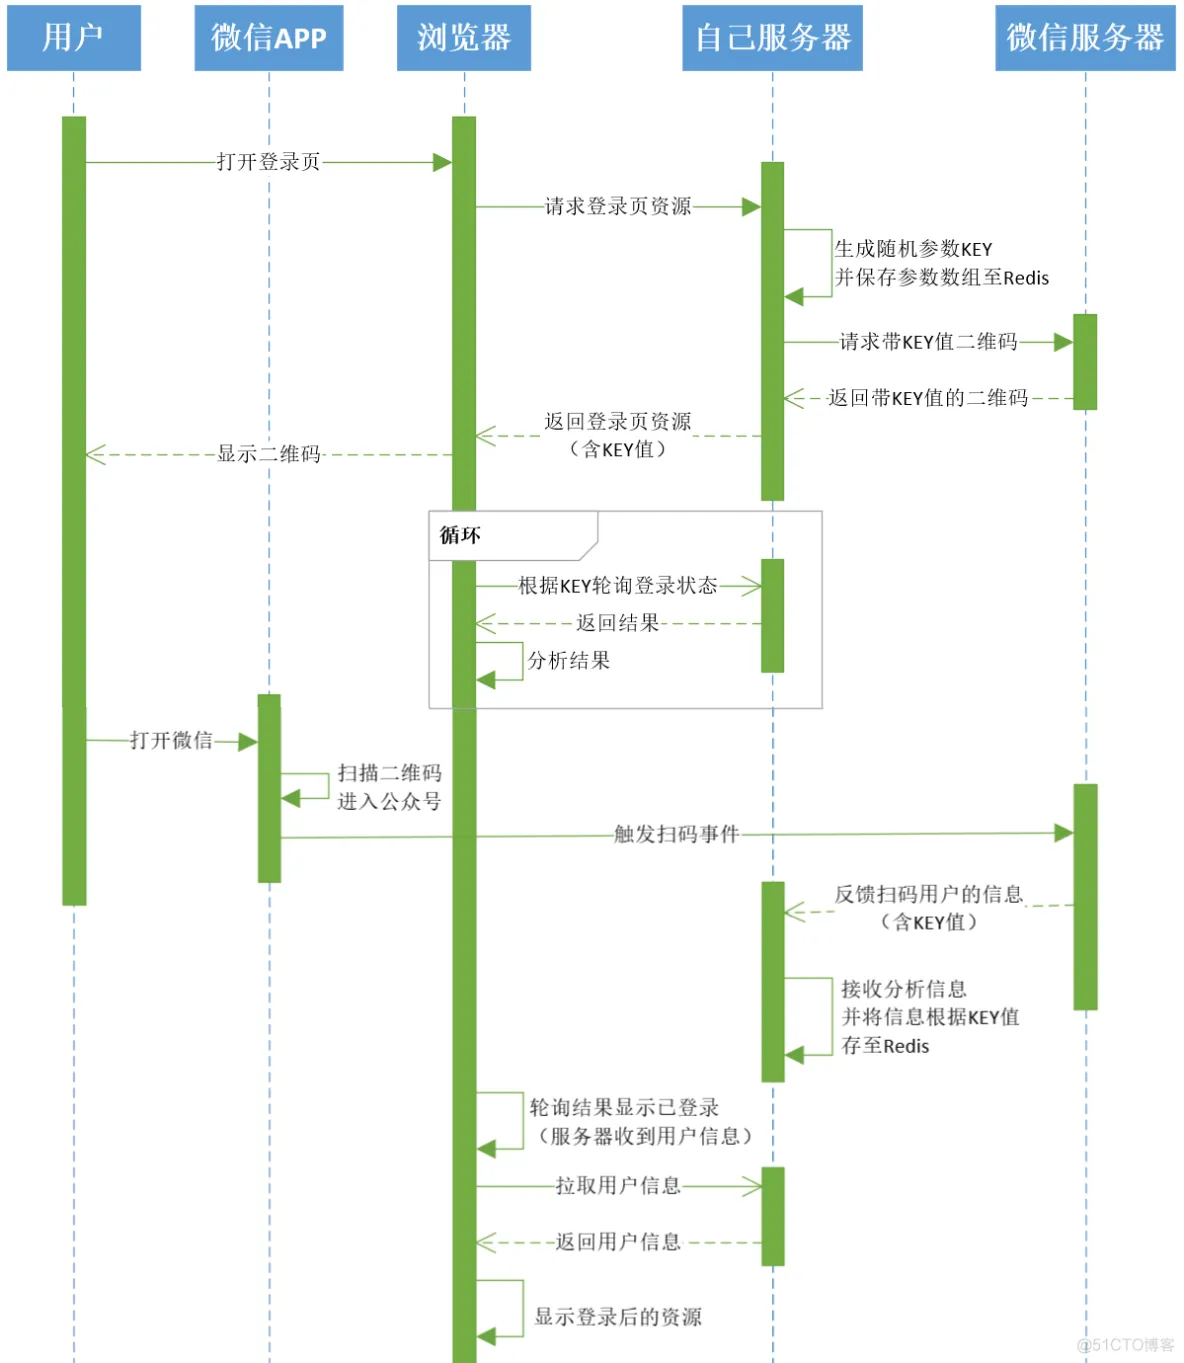
扫码登录
不要看 网站应用微信登录开发指南 里面的扫码登录,这玩意就是一个巨坑,因为它和微信的公众号数据不互通,因此还是得用公众号的扫码登录
整个流程如下所示:
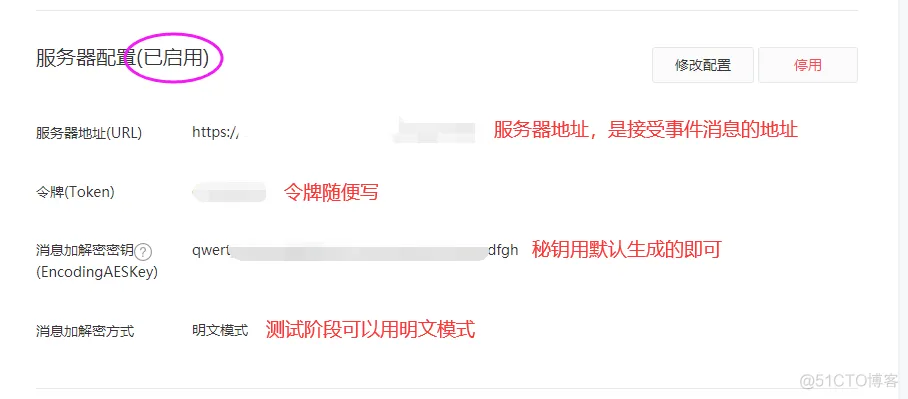
第一步:开启相关事件推送
将此域名下的接收事件消息的接口,添加至公众号后台 开发→基本配置→服务器配置,如下图:
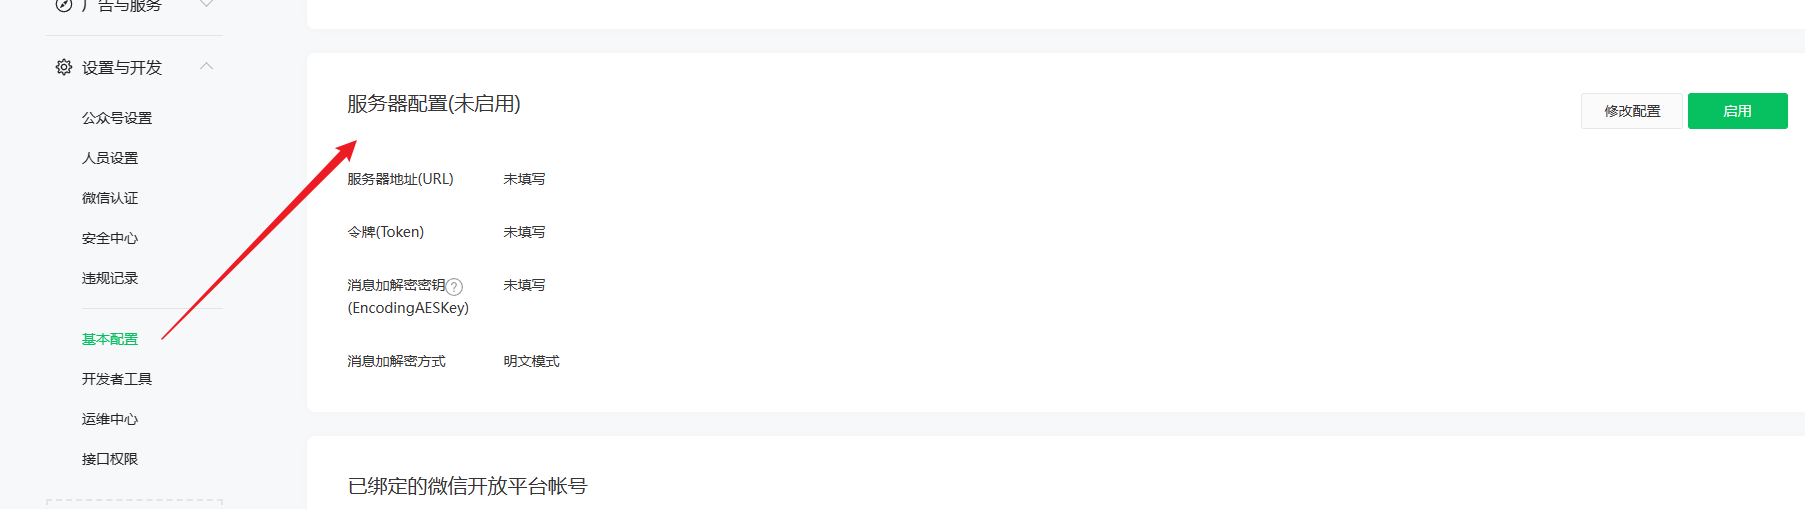
这里添加上以下配置,并开启
第二步:生成带参数的二维码
使用 https://powerwechat.artisan-cloud.com/zh/official-account/qrcode.html